Practice: Involving Families and Communities
Practice in Action
Involving Families and Communities engages students, parents, and local organizations in promoting and supporting the arts in afterschool programs. It can include anything from hosting family events and exhibiting student work in the arts to developing connections and utilizing community resources for arts projects and performances.
Think of art projects that can include parents and other family members, or that can be exhibited for a family event. It is important to include parents in the planning process for family events. Make the most of community resources in planning arts projects. Invite local artists or performers to talk to students about their work, donate supplies, or help plan and teach a particular arts skill or project, such as a community mural or a play.
Activities such as plays, concerts, dance performances, and art exhibits can be connected to social and cultural events within the community, or can provide new opportunities for communities to engage in the arts. To increase awareness of your event or activity, create and distribute posters to publicize student exhibits or performances, and directly invite families to attend these public presentations. Whenever possible, offer food and child care to encourage attendance. Provide opportunities for parents to interact with teachers and artists so that they see their child's art experience firsthand.
There is nothing more exciting to children than their parents' attendance of a public performance of their work. Whether it is a dance, a play, an art exhibition, or a choir or other musical event, parental involvement provides students with support and recognition that in turn fosters higher achievement and motivation. Also, parent and community involvement educates the community about the arts, which can further increase understanding, enjoyment, and support of the arts.
Planning Your Lesson
Great afterschool lessons start with having a clear intention about who your students are, what they are learning or need to work on, and crafting activities that engage students while supporting their academic growth. Great afterschool lessons also require planning and preparation, as there is a lot of work involved in successfully managing kids, materials, and time.
Below are suggested questions to consider while preparing your afterschool lessons. The questions are grouped into topics that correspond to the Lesson Planning Template. You can print out the template and use it as a worksheet to plan and refine your afterschool lessons, to share lesson ideas with colleagues, or to help in professional development sessions with staff.
Lesson Planning Template (PDF)
Lesson Planning Template (Word document)
Grade Level
What grade level(s) is this lesson geared to?
Duration
How long will it take to complete the lesson? One hour? One and a half hours? Will
it be divided into two or more parts, over a week, or over several weeks?
Learning Goals
What do you want students to learn or be able to do after completing this activity? What skills do you want students to develop or hone? What tasks do they need to accomplish?
Materials Needed
List all of the materials needed that will be needed to complete the activity.
Include materials that each student will need, as well as materials that students
may need to share (such as books or a computer). Also include any materials that students or instructors will need for record keeping or evaluation. Will you need to store materials for future sessions? If so, how will you do this?
Preparation
What do you need to do to prepare for this activity? Will you need to gather
materials? Will the materials need to be sorted for students or will you assign students to be "materials managers"? Are there any books or instructions that you need to read in order to prepare? Do you need a refresher in a content area? Are there questions you need to develop to help students explore or discuss the activity? Are there props that you need to have assembled in advance of the activity? Do you need to enlist another adult to help run the activity?
Think about how you might divide up groups―who works well together? Which students could assist other peers? What roles will you assign to different members of the group so that each student participates?
Now, think about the Practice that you are basing your lesson on. Reread the Practice. Are there ways in which you need to amend your lesson plan to better address the key goal(s) of the Practice? If this is your first time doing the activity, consider doing a "run through" with friends or colleagues to see what works and what you may need to change. Alternatively, you could ask a colleague to read over your lesson plan and give you feedback and suggestions for revisions.
What to Do
Think about the progression of the activity from start to finish. One model that
might be useful—and which was originally developed for science
education—is the 5E's instructional model. Each phrase of the learning
sequence can be described using five words that begin with "E": engage, explore, explain, extend, and evaluate. For more information, see
the 5E's Instructional Model.
Outcomes to Look For
How will you know that students learned what you intended them to learn through this
activity? What will be your signs or benchmarks of learning? What questions might you ask to assess their understanding? What, if any, product will they produce?
Self-Evaluation
After you conduct the activity, take a few minutes to reflect on what took place.
How do you think the lesson went? Are there things that you wish you had done differently? What will you change next time? Would you do this activity again?
Sample Lessons
Students interview older people in their family or community, and work together to create a paper quilt that represents the past and present.
Quilting the Past and Present (2-8)
Duration: Three 45-minute sessions
- Learn about the cultural history of quilting
- Use interviews to research the past
- Develop an appreciation for a community and its history
- Copy of The Patchwork Quilt by Valerie Flournoy
- Pictures or examples of various types of quilts (see the Resources tab for suggested Web sites)
- Paper and drawing materials (pencils, crayons, markers)
- Quilting the Past and Present (PDF)
- Index cards and tape
- Read The Patchwork Quilt by Valerie Flournoy.
- Research the history of quilting (optional; see Teaching Tips for suggested resources).
- Make copies of the Quilting the Past and Present (PDF) handout (one for each student).
- Read aloud The Patchwork Quilt. Show students pictures and examples of various quilts. Discuss how quilts can chronicle events, people, and places through images and symbols.
- Pass out the paper and drawing materials.
- Ask students to quickly draw images and symbols (whatever comes to mind) in response to the prompts below. Give students a separate piece of paper for each image, and allow about three to five minutes for each drawing. Save students' papers for Session 3.
- Family
- School
- Neighborhood
- Transportation
- Clothing
- House/home
- Food
- Entertainment
- Distribute the Quilting the Past and Present (PDF) handout. Ask students to interview various older family members or neighbors to find out what life was like for them growing up. Students should take notes during their interviews to use in the next session.
- Discuss what students learned in their interviews. Explore the similarities and differences between students and their elders. Note any themes that surface.
- Repeat the quick-draw activity from Session 1. This time, ask students to draw whatever comes to mind about the past in each category, keeping in mind what they learned in their interviews and the discussion. Keep students' papers for Session 3.
- Return quick-draw papers from Sessions 1 and 2. Divide students into small groups of three to four. Ask students to discuss and share their quick-draw images from the past and present.
- Ask each small group to come up with one image or symbol that best represents the past and one that best represents the present for each category (16 in all). Groups should draw/color each symbol on its own index card. Each group should also create one title index card with the word "present" and one with the word "past."
- Allow groups to arrange their "present" cards into three rows of three cards each (eight symbols plus one title card). Tape the cards together to form a quilt. Repeat with the nine "past" cards.
- Hang the "past" and "present" quilts on a wall for everyone to see.
- Student participation and engagement
- Interviews that reflect an understanding of the past
- Symbols and quilts that represent an understanding of the past and present
Students create a sculpture to reflect community themes in this public art project.
Art in Public Places (3-12)
Duration: Two to three 45-minute sessions
- Understand how working with sculpture is different from two-dimensional art
- Collect items that reflect community themes in the making of a sculpture
- Work collaboratively to develop sculptural art related to themes in the community
- Extend their work by translating their sculpture to a "living sculpture" that takes one important element of community life and "freezes" it in a moment in time
- Masking and Scotch tape, glue sticks, stapler, hammer and nails (materials to put things together)
- Scissors
- Tape measure
- Straight edge (metal ruler)
- Drop cloth
- Prepare the space where the sculpture will be created and stored between sessions.
- Assemble a collection of objects that may inspire students as they search for items to include in their sculpture.
- Have newspaper clippings and photographs of public art projects in your community.
- Sculpture is a three-dimensional art form, and certain types of sculptures are known as statues. Statues are recognizable images of persons or animals.
- Sculptures are created by different artistic techniques: carved, chiseled, modeled, cast, or constructed. They can be made of many different materials such as wood, stone, clay, metal, sand, ice, and even balloons. They are frequently abstract.
- Sculptures express ideas. An idea that organizes a piece of art is sometimes called a theme. Themes can be many things, like nature, cities, wildlife, religion, tradition, or fun.
- Wonderful examples of sculpture can be found throughout the world. Sculpture has been an important part of culture since ancient times.
- Four types of processes are used in sculpture: subtraction, substitution, addition, and manipulation.
- Most people are familiar with artists' use of traditional materials to paint and sculpt with, such as oil paint, stone, and clay. However, many contemporary artists have been known to use unconventional art materials. Some artists use everyday objects like toothpicks, pencils, and bottles to create beautiful sculptures. In this way, unusual materials are used to create a piece of art.
- Many people create sculptures from found objects such as recycled materials. These can include anything a person finds around the house, garden, classroom, or even the junkyard.
- If this piece of art is on display where people will see it as they travel through the city, it is called public art. Public art helps people associate with the themes of a community and share the experiences of the themes expressed in those objects of art.
- Engage the class in a discussion of their previous experience of sculpture and statues. Ask, Why do communities create statues? Where have you seen sculptures displayed as "public art"? Show photographs of prominent public art or other famous examples. Ask, Why is public art important for communities? List public art that students are familiar with? Ask, Which are statues and which and sculptures? What is the difference?
- Explain that the class is going to undertake the act of creating a piece of public art for the community. You may say,We're forming a team of artists to create a sculpture. The process will be to collect materials and objects from our immediate environment that reflect and represent our community—objects and materials that we can find in this room, in our personal belongings, and in the surrounding environment.
- Once students have assembled a collection of items, begin the process of taking an inventory and seeing what types of connections are being made with the objects. Ask, What should be added? Subtracted? Does one object just not fit with all the others? If so, what might be a good substitute? Are some objects able to be modified from its original shape? How do they reflect the community?
- Begin the process of gluing, nailing, stapling, and connecting the objects into a sculpture. Allow this to unfold with students taking responsibility for seeing how the object they collected can be added to the sculpture.
- Now that the sculpture is finished, what does it say about the community? What are the themes that are suggested by the amalgamation of objects into one cohesive unit? What would you suggest as a title for the sculpture?
- Ask each student to write a paragraph to talk about the theme of the sculpture. How do the objects that students collected reflect the community in which they are members? What do the objects suggest as connections to the community and the ways in which the objects were created or manufactured?
- Review the definitions that contrast sculpture with statue. A statue is a sculpture that is realistic, usually representing the human form. Sculpture is a broader term, because many sculptures are less recognizable, and therefore invite interpretation. They are "abstract."
- Invite the class to consider how the idea of their class sculpture could be represented as a statue. Discuss the idea that dancers and actors in the theatre create a kind of sculpture with their bodies called a tableau.
- Have students break into teams of three to four to brainstorm the creation of a living tableau. This is one still image, a frozen moment in which they will strike a pose with their bodies to communicate a living representation of an idea or feeling that the found object sculpture evokes.
- Have each team present its tableau. Ask students to observe carefully and comment only on what they see without rushing to interpret the meaning. The team that creates the tableau explains how they made the choices of positioning their bodies.
- Students actively seek objects that represent community values and can articulate what those connections are in the sculpture they put together
- Students collaborate on constructing the sculpture
- Students write a well-constructed paragraph to analyze the themes of the class sculpture
- Students work in teams to interpret the themes of the sculpture and create a tableau with the frozen body pose of their group
Students learn about the importance of oral traditions in different cultures, and investigate and discuss oral traditions from their own culture.
Oral Traditions (3-8)
Duration: Two 45-minute sessions
- Understand the importance of oral traditions in various cultures
- Investigate and share oral traditions that reflect students' cultures
- Pictures of storytellers from different cultures (optional)
- Materials to create a fake campfire, including scissors, tape or glue, and cardboard or construction paper in brown, orange, red, and yellow
- Research the history of various kinds of storytellers and storytelling. For example:
- African griots
- Native Americans
- Myths and legends
- American tall tales
- Spirituals
- Hispanic or Latin American traditions (corridos)
- Build a paper campfire, either on your own in advance or with students.
- Begin by sharing a story from your own family or cultural background or showing a video or picture of a storyteller from a culture represented in your community.
- Ask students why they think people tell stories. Help them understand that stories have always been a way of passing on information before writing or printing became widely available.
- Discuss the historical importance of oral traditions in various cultures. For example:
- West African griots are storytellers who pass on historical information about a village or family through generations.
- Native American storytellers use both narratives and songs that focus on four themes: sacred, beauty, place, and community.
- American tall tales come from settlers who told stories around campfires for entertainment at the end of the day.
- Spirituals come from slaves who used songs to practice religion, comfort themselves and others, and share information in ways that slave owners could not understand.
- Corridos reflect a Latin-American narrative song tradition used to celebrate folk heroes, tales of true love, and other themes.
- Ask students to think about the oral traditions that are important to their families. They may be traditional folktales or family lore, or they could be songs. Ask students to interview a parent or other relative to learn more about their own traditions.
- Have students select a story or song that is important to their family and present it to the class in a story circle. Ask them to be prepared to tell the story (or sing the song) as well as explain the significance of the story to their family.
- Review tips for good storytelling:
- Use expression in your voice and gestures to add interest the story.
- Relax and speak slowly so that everyone can understand you.
- Share any background information so that your audience understands the story better.
- Share the source for your story (where did you find this story?).
- Make eye contact with your audience and have fun!
- Clear a large open space for students to sit in a circle, with the paper campfire in the center. This will be the setting for students to tell their stories (like the American settlers did).
- Review tips for good listening (pay attention, make eye contact with the speaker, be respectful and quiet while others are talking).
- Allow students to share their stories one at a time.
- Student participation and engagement
- Interesting presentations that include vocal inflections and gestures
- An understanding of and appreciation for oral traditions of various cultures
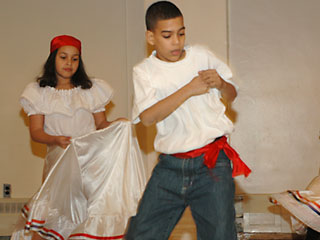
Learn how to organize a cultural dance festival to help students and parents learn more about the dances of various cultures.
Cultural Dance Festival (K-3)
Duration: 45 to 60 minutes
- Learn about the dances of various cultures
- Involve parents and community members in afterschool learning
- Audio/visual equipment (varies by performance)
- Materials for creating flyers and posters (poster board, markers, computer)
- Materials for decorating performance space
- Consider your resources (budget, volunteers, etc.). Choose a theme for your music festival, keeping in mind the cultures that are important to your students. For example:
- Today Is World Dance Day (April 29)
- Mi mundo merengue: A Celebration of Latin-American Dance
- Festival of Family Folk Dances
- The Big Blue Ballroom: A Celebration of World Dance
- Gather and identify a group of parent volunteers and community members to help plan the event.
- Identify and assign tasks (recruitment, logistics, festival publicity, etc.).
- Recruit parents and community members to share and perform folk music related to their particular cultures.
- Prepare a detailed schedule, agenda, and active contact sheet for the performers.
- Reserve the necessary space and equipment for the selected date.
- Set up the performance/booth areas as needed.
- Welcome parents/volunteers and direct them to the appropriate locations.
- Oversee, coordinate, and introduce the performances and demonstrations as needed.
- Thank all volunteers, participants, and guests.
- Break down the performance/booth areas.
- Evaluate the event (optional).
- Parent and student participation and involvement
- Student participation in various dance activities
- Students learn about and appreciate the dances of various cultures
- Performances that honor the dances of various cultures
Learn how students, parents, afterschool staff, and community volunteers can come together to organize a cultural music festival.
Cultural Music Festival (K-3)
Duration: 45 to 60 minutes
- Involve parents and community members in an afterschool arts program
- Learn about the music of various cultures
- Engage parents in their children's learning
- Audio/visual equipment (varies by performance)
- Materials for creating flyers and posters (poster board, markers, computer)
- Materials for decorating the performance space
- Ask students to bring in and share music that reflects their cultural background.
- Consider your resources (budget, volunteers, etc.). Think of a theme for your music festival. For example:
- Music Around the World
- El mundo músico: A Celebration of Latin-American Music
- Festival of Family Folk Songs
- Drum Circle: The World as a Drum
- Gather and identify a group of parent volunteers and community members to help plan the event.
- Identify and assign tasks (recruitment, logistics, festival publicity, etc.).
- Recruit parents and community members to share and perform folk music related to their particular cultures.
- Prepare a detailed schedule, agenda, and active contact sheet for the performers.
- Reserve the necessary space and equipment for the selected date.
- Set up the performance/booth areas as needed.
- Welcome parents/volunteers and direct them to the appropriate locations.
- Oversee, coordinate, and introduce the performances and demonstrations as needed.
- Thank all volunteers, participants, and guests.
- Break down the performance/booth areas.
- Evaluate the event (optional).
- Parent and student participation and involvement
- Student participation in various music activities
- Students learn about and appreciate the music of various cultures
- Performances that honor the music of various cultures
Resources
Music lessons can be a great opportunity for students and parents to interact with teachers and musicians. Offer lessons for adults as well as children, hold recitals for the community, and encourage parents and children to play duets. The Musical Instrument Digital Interface (MIDI) is a technology tool that lets even young children perform and compose music.
Research Summary: The issue of community is fundamental to afterschool, but also important to schools. Stevenson and Deasy in their research in ten schools about how the arts contribute to the improvement of schools that serve economically disadvantaged communities (Third Space: When Learning Matters, 2005), found that arts programming had profound effects on building community within and around the schools, community that sustained and learned from the interaction. YouthARTS found that successful afterschool programs recognize and involve the community, and that programs that involve the youths' families provide the opportunity for greatest impact (2003). It is communities that sustain programs; that come to performances; that watch their children grow. Family and community are essential elements of afterschool and the arts.
- Stevenson, Lauren and Richard J. Deasy (2005) Third Space: Where Learning Matters. Arts Education Partnership: Washington D.C.
- YouthARTS (2003). Arts Programs for Youth At Risk: The Handbook. Retrieved from the web: Americans for the Arts.